The QT is better in the context of being a "User". There's a subtle difference that took me a LONG time to understand.
The sharpest aperture on the QT and MGs is f/5.6. The MG-s doesn't come to a focus at infinity unless you use f/11 or f/16. ("Minolta-16 Guide" Rosenberg, Amphoto, 1973.) If you photograph a landscape with the MGs, it cannot compare favourably with an image from a QT shooting at f/5.6. Here's why.
If you set the shutter speed of the MGs so that it is forced to use f/5.6 for your particular subject, you run into two problems:
(1) The maximum depth of field becomes 6' 11" to 31' 10-1/4".
(2) If you change cassettes and use a faster film, so that you can get the depth of field, not only will the image be less sharp, it will be grainier.
By comparison, a QT on the 'landscape' setting at f/5.6, has a depth of field from 11' 8-1/6" to infinity. You get to keep your fine grain film, and shoot at the sharpest aperture. This (to me) is the difference between choosing a camera as the result of a bench test, or choosing a "user".
The QT also offers a 'wild card'. It is the only subminiature with f/22. When set at 6-1/2 ft, the depth of field at f/22 is from infinity down to 2' 9-1/4". I have taken shots with my hand on a subject in the foreground, showing trees on the horizon. Both in focus. Not TACK sharp, but the prints were useable.
Coming back to your question about "better, versus appearing to be better" I'll settle for 'appearing to be' when I have to earn a living. I read the bench test results on subminiature cameras when I'm forced to sit somewhere waiting for a flight.
Perhaps the biggest laugh in all subminiature, is that the Minicord still appears on lists of "sharpest" lenses. But that's a whole 'nother thread. Subminiature lives!
"I've found the Minolta MG-S to be a great all round performer. With the fast 2.8 lens, fast film (ISO 400 or faster) and CDS meter, I can comfortable take pictures in low light conditions. With the larger negative size, the grain is not too bad. When I go outside I use the same film, but to avoid having to stop down the lens too far (which would cause diffraction problems) I slip on a Yellow filter with a gelatine neutral density filter attached to the back. This allows me to use a wider aperture. Who needs 35mm?"
Joe McGloin SubClub.org, November 1996
The QT was the last of the Minolta 16's. It was introduced in 1972 but only for a couple of years. It is similar to the MG-s and shares some of the same accessories, but as all newer cameras it contained more plastic, which made it somewhat lighter.
The Minolta 16 QT is a semi automatic camera, that is, you can point, adjust the exposure and focus with the camera at your eye. The correct exposure is determined with the camera at your eye and viewing through the view finder, while pressing on the EE switch and rotating the aperture wheel under the EE switch. An O or a K will appear. If the O appears this indicates over exposure, if the K appears this indicates under exposure. Rotation of the aperture wheel will cause both the O and the K to appear indicating correct exposure. There is a shutter speed select lever that allows 1/250 sec. or 1/30 sec. The aperture is adjustable from f22 to f3.5.
Focusing is accomplished via. a slide which will give you zone focusing . There are four zones, Landscape, Group, Bust, Head and shoulders. The lens sliding cover acts as a switch for the cameras metering system and prevents a picture being taken inadvertently by locking the shutter release button.
The camera was designed for the PX30 battery that is no longer produced. This is a 3 volt battery. Any 3 volt battery will work, if it makes contact in the battery holder. The camera can be used completely manual if the battery conks out but you will have to use some other means of determining exposure.
The Minolta QT uses a 3 V battery the PX30 that is no longer made. Although, there may be some of these batteries around in some out of the way places, they are not available for most of us. There may be some stores in your area that might have the PX30 or even the PX825. A PX30 is made up of two PX825's. If you can find the PX825's get a couple and use them.
There is an alternative, use one of the new 3 V lithium batteries. There are several Lithium batteries that will fit in the battery holder and that is the most important thing. The PX30 is 13mm (.92") diameter. X 12mm (.450") thick so the battery you select should fit inside of these dimensions. One battery is the 2L76 is .455" dia. X .425 long, it is much smaller so you have to make something to center it in the battery compartment. Out of some high density foam or even Styrofoam of 3/8" thick, cut a circle the size of the PX30 .9 to .92" in dia., this will fit the battery compartment of the QT. Now cut a hole in the center of the disk for the 2L76 battery. This hole should be slightly smaller than the battery for a snug fit. Insert the battery and try for fit in the camera. Take care to notice the polarity of the battery. Notice that the battery fits loose in the battery clips. Use a pair of tweezers to re-shape the battery contacts, bend out toward the battery. Adjust as necessary to get good battery contact.
One substitute battery is a CR2450. A simple spacer can be built using four 1 pence pieces, two either side of the CR2450. The CR2450 has a larger diameter than a PX8, but is very thin. Ideally the adapter shown above, designed by Tom Desaulniers, should be made.
If your camera suddenly quits working because of what you think is a dead battery but replacement of the battery didn't cure the problem, look at the negative battery contact. This contact is glued to the side wall of the battery compartment with a rubber cement and may over the years move a little. If it has moved up, then the EE switch when depressed will not make contact with the battery, to provide circuit power for the metering and LEDs. This negative plate has a small portion on the bottom that acts as a spring contact. When the EE switch is depressed there is a contact that moves down through the body in the bottom of the battery compartment to make electrical contact with this plate. If your plate is loose or has moved, this spring loaded contact will not touch the battery contact, thus no LED indication. Carefully, remove it and clean off the back side of glue residue and the side of the battery compartment too. With the plate off depress the EE switch and look at the contact point in the bottom of the battery compartment. If bright and shiny OK, if not clean it by scraping with a sharp point of a knife or other pointed object. After cleaning, check the fit of the plate and make sure that the small bent portion that makes electrical contact fits down securely over the hole where the EE contact comes up, if not bend it slightly. Re-glue the plate to the camera body using a small dab of a good contact cement. hold it in position until set, then set aside for 24 hrs. to cure before use.
The spring contact can also be accessed by taking the top off the camera, which is also needed if the shutter release is sticky or jams. Amateur camera repairs need nerves of steel and it is preferable to try a camera for which you have no investment. This is an essential mental step for the amateur camera repairman. If you care too much, don't start to try to fix any camera. The odds are too high you will become unhappy.
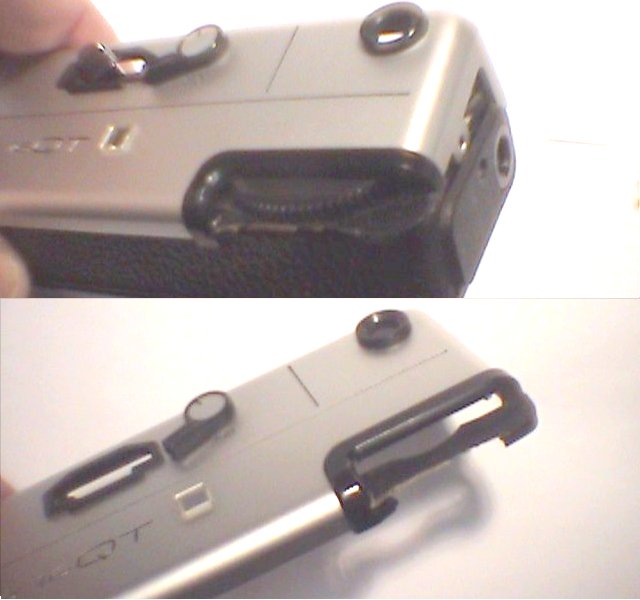
The QT is one of the easiest cameras to work on. You only need to remove 2 screws to get the top off, one at the tripod socket end, and one at the flash end. Some say you have to remove the screw in the middle of the tripod socket and a ring on the opposite end, but that's not true. The screws are different lengths, don't get them mixed up (the short one at the flash end, the long one at the tripod end). Carefully pry up the cover, starting at the corner by the viewfinder, and watch out for the thin plastic piece that sits above the winding knob. If it comes off, don't worry, you can glue it back later.
You can avoid any damage to the plastic below the film winder by taking the screw out of the film take-up drive spindle inside the camera. However this will release one lever and other parts could get dislodge without a clue how to put it back together afterwards.
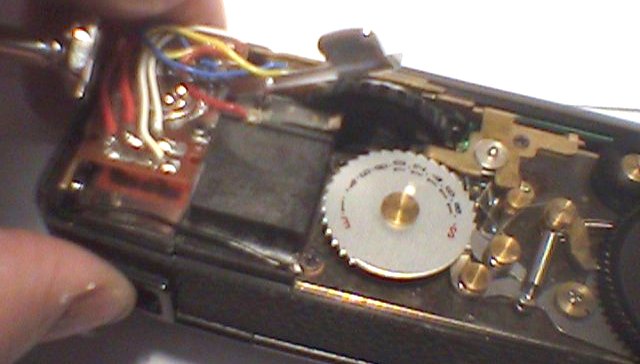
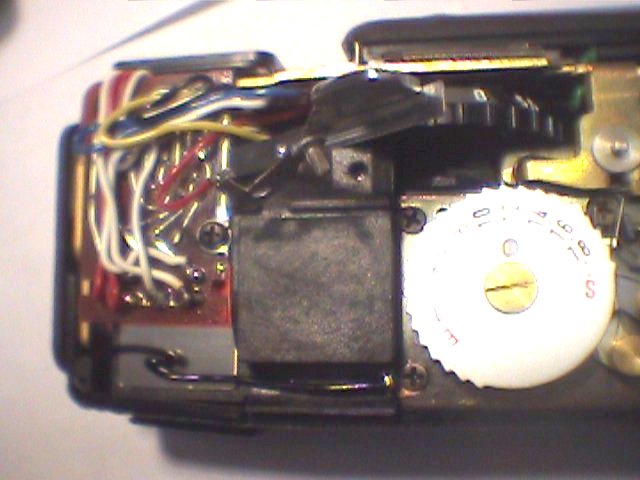
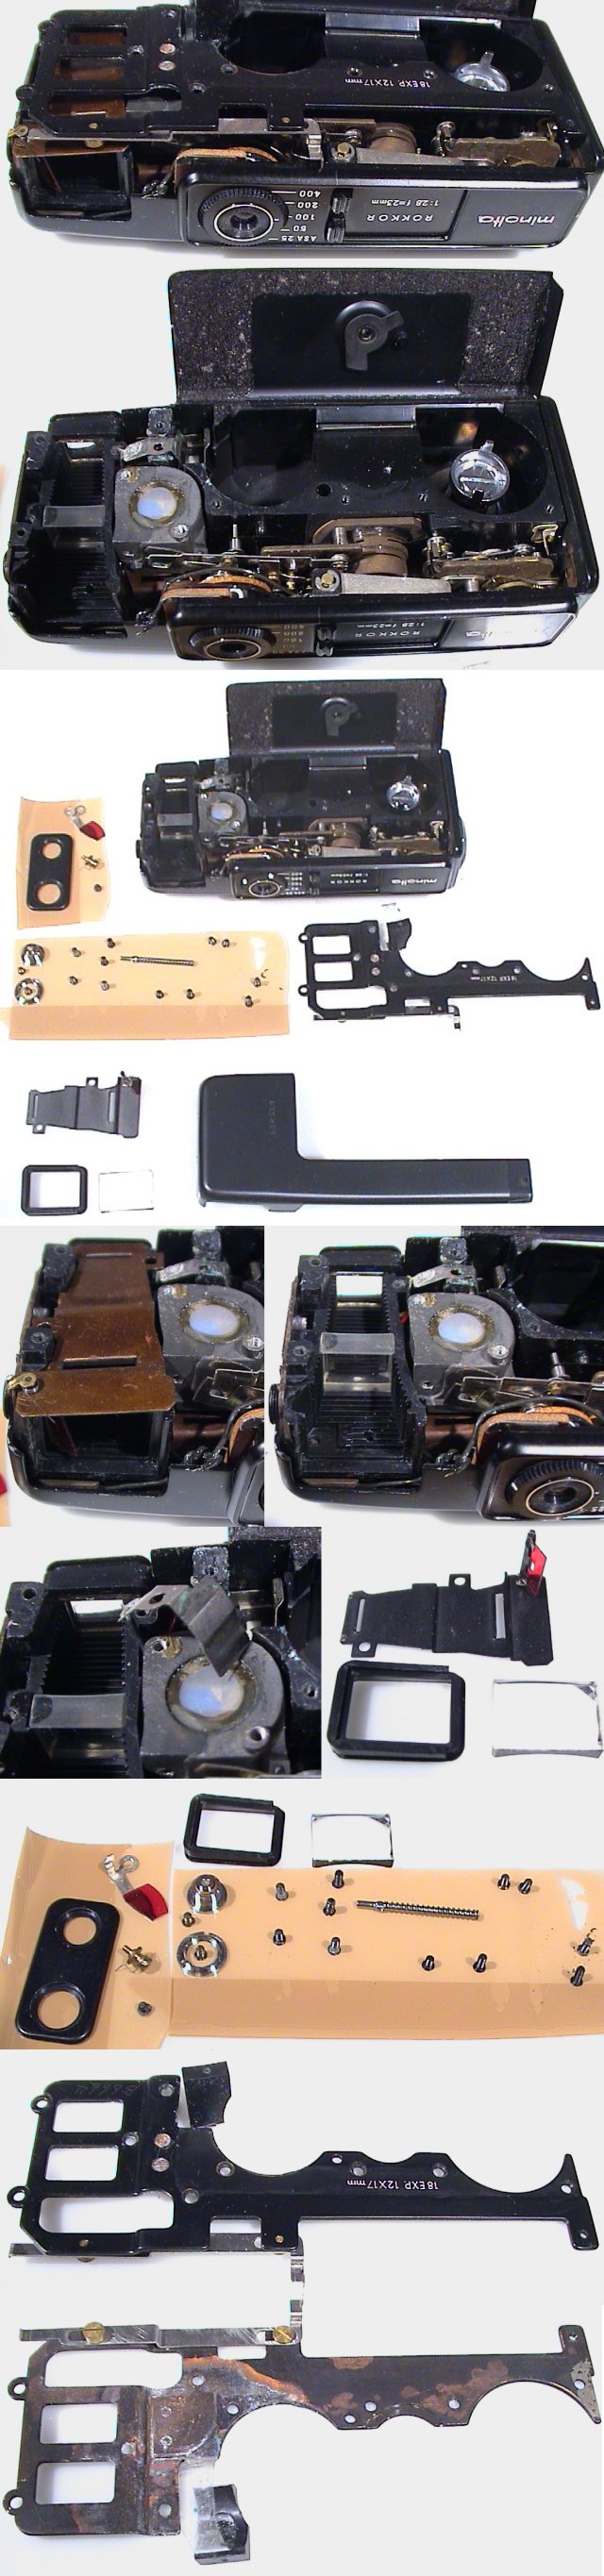
Typically the camera shutter is gummed up because the control levers under/around the film advance wheel become caked with dead oil/grease.
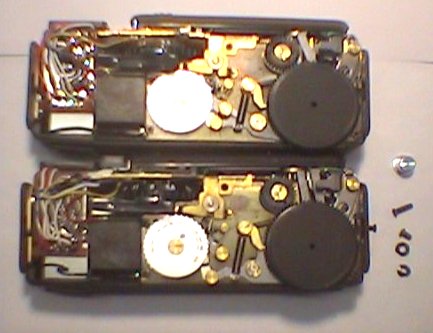
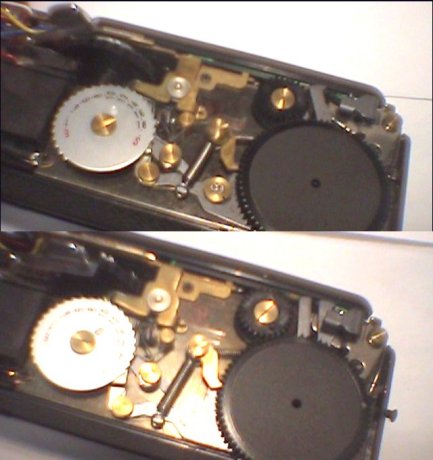
The two photographs shows the correct film advance position of the levers (QT at the top) and the jammed stage (QT at the bottom).
Note the long and short screw and the loose shutter release button. To avoid problems re-fitting later use a strip of cello tape to over the shutter release (on the outside of the camera). This keeps it in place, but does not prevent it's use. There are two washers just inside the black plastic where you removed the screws. They may come out attached to the top, fall on the floor or stay hidden inside. These are small black plastic washers and can be a pain to refit. Another tip is to put the two tiny screws temporarily back in place, with the top off so they don't go for a walk.
Use a Q-tip, tissue or a clean cloth and mop around, lifting the advance wheel off and cleaning under the lever under it, especially, as this has to shift back and forth easily. A light coating of some model train light machine oil where it looks like needed it can help. Alternatively use a toothpick dipped in Singer sewing machine oil and dab a little on the arms and levers, and work the mechanism.
While the camera is open inspect the EE switch and the contact made. The spring next to the aperture wheel (see photographs below) makes contact with another spring which in turn makes contact with a small strip inside the battery chamber. The spring is held in place by a small screw. Remove the screw and clean the spring where it makes contact with the larger spring above it and also clean up the peg - a metal spike that makes contact into the battery chamber. This peg frequently gets corroded. The tolerance to make contact is low and it may be necessary to extend the length slightly - a very small dab of solder does the job. Solder is soft so will ware quickly, but this is a minimum risk fix to the problem.
The tricky part is putting the advance wheel back on because it has to do a number of things at once - turn that little black geared wheel on the camera's left front while at the same time working the levers under it. Lift and replace until you see what's going on and which position makes the whole thing work properly. It takes about five minutes. You can turn and fire the shutter without the top on. The shutter release is on the right front of the camera. If you were careful taking the top off, the shutter button was sitting on top of it and fell off the first time you tipped the camera.
One method is to screw the advance wheel back in place. This allows you to see the levers in place and that everything is in working order. This makes replacing the top harder, but nothing is going to fall out of place. Lever the top on from the back sliding the plastic under the wheel. This plastic is tiny and will flex a little without breaking (the glue is likely to come undone now, if it had not before). Don't force anything and make sure that the EE contact switch is behind the aperture wheel before snapping shut.
Reassemble, making sure the speed selector lever connects with its tab. The speed selector is a brass plate (see photograph above) along the front of the camera with a lever poking up just back from the front. Push this over to the left, set the lever on the top place of the camera to 30, put back on and try it out to make sure the speeds are changing, otherwise you got to take the whole damn thing apart again, at which point you will wish you cello taped the shutter release button.
If the 1/30 speed is a bit draggy and erratic you have to open up the camera again. To mess with the speed controller you do NOT need to remove the film take-up spindle. In fact, it is recommend that you do not because the screw that holds the film take-up spool in place also holds the film advance wheel inside the camera in place, and taking that off again, or even having it come loose, just complicates things for this operation. If you look down in the front of the camera on the shutter-button side and work the shutter a few times it is clear to see - a geared lever that rocks back and forth at 1/30, turning a wheel whose inertia provides the delay for the shutter. Put a VERY thin skin of oil along the top of these teeth, and also oiled the hinge it rotates on and the hinge of the device that it turns as it rocks back and forth. It cannot stress enough that if you do this, use high grade machine oil (model railroad shops sell it) and use very little. Take a tiny screwdriver and put just barely enough to see on the end of it and let that soak into the hinges being oiled. Better too little than too much. Do NOT use WD-40 as it evaporates after a while and leaves a scummy skin that jams things up. Do NOT spray anything in there. Reassemble again and see if the shutter speeds now seem consistent.
Charlie Trentleman, with additional material by James A Jones, Al Doyle and photographs and editing by Gerald McMullon.
The QT has zone focusing that can be viewed through the view finder. On the left is Landscape or Infinity Then the next is group 11.5', then Bust 6.5', and finally Portrait or 4'. These distances are helpful to know.
The QT has an ASA range of 50 to 400. If using a film of ASA 25, set the camera for ASA 50 take the normal exposure and note the reading then increase the exposure by 1 f stop. Example: if the exposure reads f8, @ 1/250, change the aperture to f5.6.
Minolta 16mm cameras do not need any perforations in the film to advance the frame. Single, double, or non-perforated film are all suitable. Double perforations in the MG-s/QT will simply have some sprocket holes in the negative. You could crop them out of the photo.
Cameras that use the larger format -- MG-s and QT and their ilk like the Kiev series -- ONLY use un-perforated or single perforation and the film must be loaded so the perforations are next to the cassette bridge. Otherwise you end up with perforated holes in your pictures. Take it from one who made that particular goof. Charlie Trentelman
Actually, all the Minolta instruction booklets show you how to reload the film cassettes & what film perforations to choose
GOATHILL (http://www.subclub.org/sponsors/goathil2.htm) carry a wide variety of films designed to fit hundreds of subminiature cameras including colour, black & white, negative & slide; even microfilm & infrared emulsions. They can supply slide mounts from full-frame 35mm to Minolta/Rollei 16mm. Glassless & glass mounts as well. A wide variety of owner's manuals, articles & books available. If you lack the time or facilities needed to reload your own subminiature cassettes, they'll do it for you! E-mail: xkaes@aol.com
David Maliniak of Covert Camera today does a wonderful job in processing 16mm film and printing it. The film and prints came back in a professional looking film mailer, the negatives in nice, clear vinyl protector sleeves. The prints were excellent quality (free of dust and water marks, etc., as were the negatives themselves) as you would expect of a professional quality service. I received them back (along with a reloaded film cartridge) exactly two weeks from the day that I put them into the mail to him, which is the same turn around or slightly better than what I get with MPL. Dave also provides this excellent service for Minox film as well. No vested interest in Covert Camera, just a very satisfied customer wanting to share the news with those Minolta and Minox owners looking for a good source of commercial film loadings and processing services. D. Scott Young [2002/03/02]
Al Doyle supplies a great deal of subminiature films. If you're ever looking for something 'off the beaten path' e.g. Ultra High Resolution, RAR, or InfraRed, just drop him a line.
Have you ever noticed that the felt or foam rubber light trapping in cameras often disintegrates after about 20 years and contaminates the insides of a camera, as well as resulting in lightleaks? Well I thought the Min16 was cool cuz there wasn't any light trapping in the film chamber to allow this. In fact very little plastic in the whole camera.
WRONG. Inside the camera there is some of that old light trapping around the lens. The aperture blades can drag the old stuff into the lens. You wouldn't notice this until you disassemble the camera & look thru the lens. & even then it would be very tricky to blow the stuff out w/o maybe compromising the alignment of the lens.
Something to consider if you're min16 results are funky. Bernard Delgado, Submini-L January 1997
"You can find the foam sheets at Wal-Mart, 89 cents for a 8 x 11 inch sheet. They have them in the crafts section, and the brand name is Foamies. You'll want the black (obviously) and get some double-sided sticky tape. Stick the tape to one side of the foam, then cut out the strip you need with an Xacto knife. Finally, peel away the backing on the tape and stick it on the film door. You can clean the old gooey foam away with lighter fluid." James A. Jones
Replacing the foam may not be strictly necessary. The foam is not a light seal, but may stop the cartridge door from rattling and act as a dust trap. Light does not go around bends and the interior of the camera is matt black so reflections are minimal from the surface.
"The sticky mess that the foam seal becomes after so many years should be
removed because it deposits grit and flakes all over the place.
Removing the goop is a messy job. Once the mess is totally cleaned up, it is not really much trouble to replace it with newer, more stable material.
Be it for light trapping or a seal against dust, once the old stuff is gone, it is only a matter of a few more minutes to stick on some new material."
David Foy
| Item | Voltage | Original | Replacement |
| MG-s | PX675 | Wien Air cell | |
| QT | 3v | PX30 or 2xPX825 | CR2450 or AKADL2450 with spacer |
| EE II | PX625 | ||
| Flash Units | 15V | 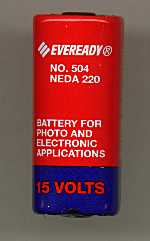 |
First things that need to be removed are the flash sync socket and the ring around the tripod screw. These can both be removed with the fancy little tool designed for those two-holed bolts, or a pair of thick tweezers. Be careful not to slip on these, as it leaves unsightly scratches.
Once these are removed, you'll need to also remove the screw holding down the shutter speed/ISO dial. When you lift the shutter speed/ISO dial assembly out, be careful as there are about a half-dozen pieces here. They're all quite easy to put back in, though - just try to keep them in the correct order. There's a slotted hole in the middle, an offset pin (and a hole it needs to mate into), and a cam.
Once you have all that out (and you've recovered from the light-headed no-turning-back feeling) remove the three screws around the tripod mount. The front of the case should now slide off.
The back of the case still has one screw holding it in, and it's that round dimple on the back of the camera. Carefully unscrew this (I used a pair of serrated-edge tweezers to get a grip on it) and the back should now carefully slide off the camera. And you'll be left with the wonderful innards of a Minolta MG on your bench.
Everything is pretty logically laid out here. The assembly that links the close-up dipoter to the little flag in the viewfinder is a bit unconventional, so study it carefully before you remove it, and don't force any of the pieces. Pay particular attention to the locations of the various screws; some are only marginally shorter or longer than others, but its critical that the right screw be put back into the right hole, as that fraction of a bit can make all the difference in everything working smoothly.
Reassembly is basically the reverse-order of disassembly. Slide the back cover onto the camera (making sure you have the tripod mount in position correctly - and notice that two of the screw holes are larger than the third; the two large screw holes go onto the back-cover, and the third is for the front cover) and secure it with the large sound bolt on the back. If you stare long enough at the shutter speed/iso coupling and the inside of the camera, you'll see that there's a logical way for this to be inserted. Everything needs to be "just-so" when you slide it in place, and rotate it once its in to make sure everything feels right. Put the two screws in beside the tripod mount, and if everything is lined up "just so", it'll fit like a charm.
The only real pain in the neck that I found was getting the front cover on. The shutter lever has a tendency to stick up in the camera, making it impossible to get the front cover on completely. To remedy this, I pushed down on the shutter lever while applying some force to the door over the lens. This "holds" that lever in place as long as you keep applying tension to the door. Then, with your third hand and you extra seventeen fingers, work the front panel with the shutter button in place onto the camera, and if all goes well it'll seat itself properly. Screw the flash sync plug in, the third screw next to the tripod mount, and finally screw on the bezel to the tripod mount. Michael Helms
Getting inside a Minolta 16P or 16Ps is easy, a few screws around the tripod socket and you are nearly there. Note the way the strap's bracket is fitted.
The camera shown here had the battery left inside and stored for many years. The shutter was working on manual settings but the light meter dead. The sponge around the film chamber door has decayed, but this is normal for the model. This sponge acts as much as a dust trap as a light trap.
It is useful to get a copy of the repair manual. Unfortunately the exploded views do not give a guide as to how to remove the leather or precautions necessary in disassembly.
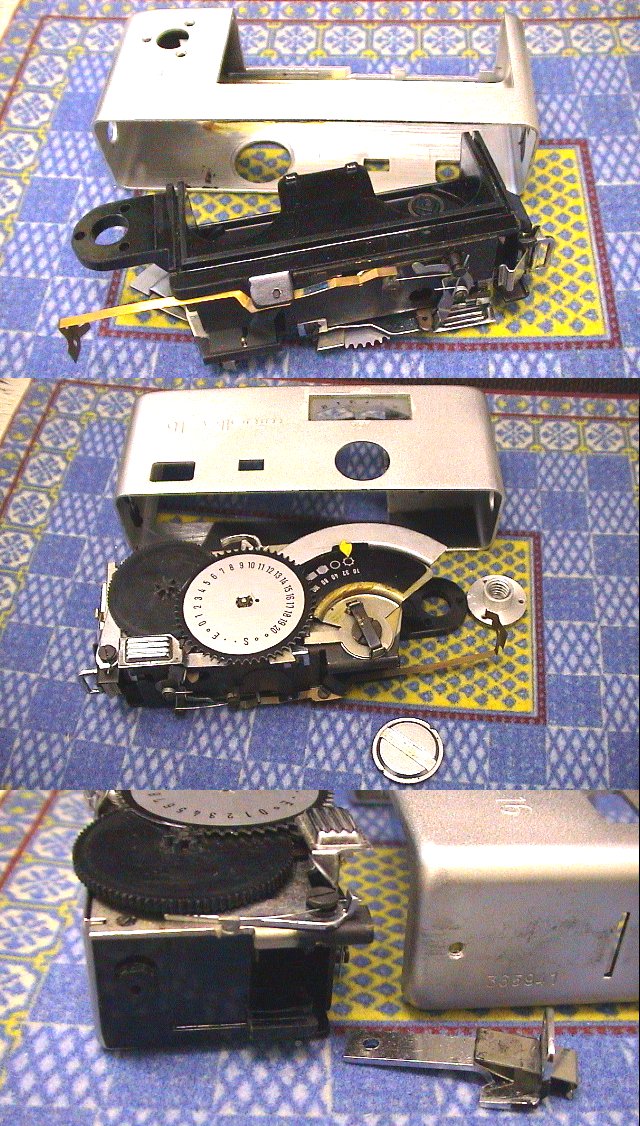
Getting inside a Minolta MG-s requires the two pieces surrounding the flash contact and locking screw and un-doing a large number of screws.
Battery leak covered the plate with the engraving 18 EXP 12x17mm. The battery pull tag is held in place by a plate retained by two screws. These do not need to be removed. The screws have been carefully laid out on sticky tape to avoid losing them. Note the plate below the viewfinder (top left in the photographs) had a brass piece and spring. To remove this plate the flag showing low light condition has to be removed. This is also held in place by a brass nut with a spring around it.
The battery terminals, the screw holes and the bottom plate where all corroded. The wire from one of the battery terminal that passes over the top of the view finder to the cell window at the front of the camera was also covered in the leakage from the battery. The wire connects with another wire and both are soldered to the PCB that holds the cell. This joint was dry and light brushing broke it off. The meter still worked with the wire cleaned and re-connected. However to complete the repair the front of the camera has to be taken off and this requires the leather to be removed at the chain end of the camera in order to undo 6 more screws.
The first set of photographs shows the first stage of disassembly. This camera has a working meter, but like the camera in the second set of photographs the battery leak is visible inside the camera. Two screws on this one where so tight that they would not move and the heads where sheared off to get inside.

More to follow.
![]() Last updated 17th August 2004
Last updated 17th August 2004